
The Real Problems With AI Children's Book Illustrations — One Author's Experience
An honest conversation about experimenting with AI, discovering what a children’s picture book needed, and collaborating with a professional storybook illustrator to bring the story together.
From AI Concepts to Custom Book Cover Design Services & Illustrations
Every children's book begins with an idea, but turning that idea into a finished book involves professional book cover design services and hundreds of creative decisions. For Dr. Michelle Dartis, the journey of Obasi's First Haircut began with a manuscript and early visual experiments using AI. As the story developed, she realized that working with an experienced storybook illustrator was essential to capture the correct cultural details and visual consistency.
Released Jun 30, 2026
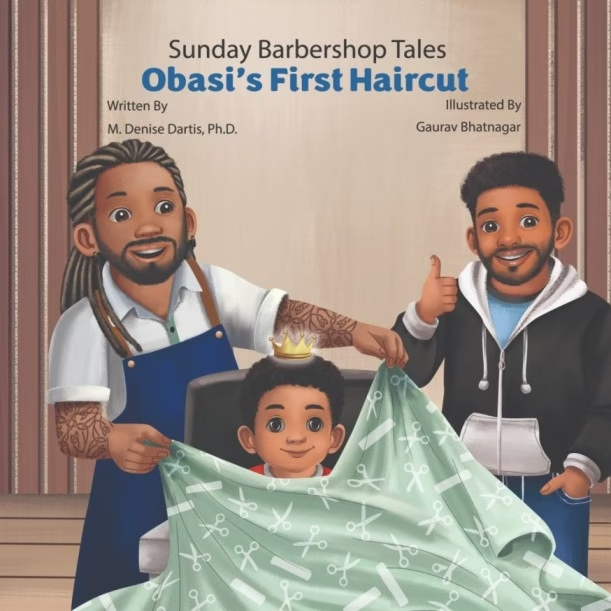
Sunday Barbershop Tales: Obasi’s First Haircut
Dr. Michelle Dartis’s picture book featuring custom book cover design services, hand-drawn art about Obasi’s first haircut, confidence, family, and the community found in the neighborhood barbershop.
View the Book on AmazonWhat happens when an author starts with AI but realizes the book needs a professional artist? In this interview, Dr. Michelle Dartis shares the real story behind Sunday Barbershop Tales: Obasi’s First Haircut—why AI appealed to her, what she learned from months of experimentation, why consistency became a challenge, and how her AI concepts ultimately became useful references during her collaboration with a trusted storybook illustrator, Gaurav Bhatnagar.
Editorial note: This is an interview-based article. Michelle’s responses are presented in her first-person voice and have been formatted for web readability. No new statements have been attributed to Michelle beyond her interview responses.
Here’s what that journey actually looked like.
Watch: Dr. Michelle Dartis shares her publishing journey
Video coming soon — Michelle walks through her experience with AI, the turning point, and holding the finished book for the first time.
Tell us a little about yourself — what you do, and what inspired you to write Obasi's First Haircut.
My name is Dr. Michelle Dartis, and I am the founder and creative director of Leave A Mark Press LLC, an independent publishing company dedicated to creating books that inspire, educate, and preserve meaningful stories. Professionally, I work as both a therapist and a behavior consultant, and much of my career has centered on supporting children, families, and individuals as they navigate life’s challenges. I am also a public historian and children’s book author who believes stories can educate, affirm, and leave a lasting mark.
The idea for Sunday Barbershop Tales: Obasi’s First Haircut came to me during the summer of 2025 after several mothers approached my author table and asked whether I had books specifically for young boys. At the time, I realized that although I had written several children’s books, I did not yet have a story centered on a young boy’s experience.
Their questions stayed with me and led me to think about a meaningful milestone that many boys experience: their first haircut. From there, the idea grew into a story set within the warmth, humor, and cultural richness of the Black barbershop. Although the story is grounded in that cultural experience, the emotions surrounding a first haircut—uncertainty, excitement, reassurance, and pride—are relatable to children and families from many backgrounds.
I also wanted to capture the sense of community found inside the neighborhood barbershop, where conversation, laughter, encouragement, and mentorship are often as much a part of the experience as the haircut itself. What began as feedback from mothers at my author table ultimately became an opportunity to expand my catalog and create a story in which more young boys could see themselves reflected.
Rooted in real feedback from mothers at author events, the book was created to fill a gap for relatable stories centering young Black boys and universal milestones.
What did you hope children (and the parents reading with them) would feel or take away from Obasi's story?
My hope was that children, especially young boys, would see themselves in Obasi and realize that it's okay to feel a little nervous about trying something new. Whether it's a first haircut or another important milestone, those feelings are completely normal. I wanted children to see how encouragement, patience, and kindness can help transform uncertainty into confidence.
For parents and caregivers, I hoped the story would serve as a reminder that what may seem like an ordinary event to an adult can be a significant experience for a child. The way adults respond—with reassurance, humor, and support—can shape how children remember those moments for years to come.
I also wanted readers to experience the warmth and sense of community found in the Black barbershop. For many families, the barbershop is much more than a place to get a haircut. It is a place where relationships are built, stories are shared, laughter is common, and boys see positive role models interacting with one another. While the setting reflects a culturally significant space, the themes of love, encouragement, belonging, and growing confidence are universal.
Above all, I hope families finish the book smiling, perhaps remembering a first haircut of their own, and recognizing that some of life's most meaningful memories are created during the simplest everyday moments.
Lastly, I also wanted Black boys to have the opportunity to see themselves reflected in a joyful, affirming story while inviting children from all backgrounds to appreciate an experience rooted in love, family, and community.
The story normalizes childhood nervousness while reminding adults of the lasting impact of patience, positive role models, and shared everyday moments.
As someone who works with children and families, did your professional experience influence the way you approached writing Obasi's First Haircut?
My professional experience had a significant influence on how I approached writing Obasi's First Haircut. As both a therapist and a behavior consultant, I have spent many years working with children and families from diverse backgrounds. Those experiences have given me a greater appreciation for how children process new situations, express their emotions, and build confidence through positive relationships.
When I wrote Obasi, I intentionally wanted his feelings to be authentic. It's common for children to experience uncertainty or even anxiety before trying something new, whether it's starting school, visiting the doctor, or getting their first haircut. Rather than dismissing those feelings, I wanted to normalize them and show how caring, patient adults can help children work through them.
My work has also reinforced the importance of positive adult role models. In Obasi's First Haircut, the adults don't pressure or shame him. Instead, they encourage him, reassure him, and allow him to move through the experience with support and dignity. Those are the kinds of interactions I have witnessed throughout my career and the kinds of relationships I hope children experience in their own lives.
Ultimately, I believe children's books can do more than entertain. They can help children understand their emotions, strengthen family connections, and open the door to meaningful conversations between children and the adults who love them. That philosophy continues to shape every children's book I write.
Professional therapy background shaped Obasi's authentic emotional responses and highlighted the power of patient, supportive adult guidance.
When you decided to publish, what stage were you at, and what options were you weighing for illustrations?
By the time I decided to publish Obasi's First Haircut, the manuscript itself was complete, and I had a clear vision of the story I wanted to tell. The next major decision was how to bring the characters and scenes to life visually.
As an independent publisher, I carefully considered my options. On one hand, AI-generated illustrations had become increasingly accessible and offered a more affordable way to explore visual concepts. On the other hand, I understood that hiring a professional storybook illustrator would require a much larger financial investment but could also provide a higher level of artistic collaboration and consistency.
Initially, I chose to experiment with AI-generated illustrations because they allowed me to visualize my ideas, refine my characters, and explore different artistic styles while staying within my budget. At that stage, I wasn't sure whether those images would become the final illustrations or simply serve as a stepping stone toward custom artwork.
Looking back, I'm glad I gave myself permission to explore both options before making a final decision. That process helped me better understand what the story needed and ultimately gave me confidence in the path I chose.
Although the AI images were not ultimately used in the finished book, they played an important role in helping me refine my vision for the characters before I transitioned to custom illustration.
Balancing budget constraints against long-term quality led to exploring both AI generation and custom illustration before committing.
You initially experimented with AI-generated illustrations before we worked together. What made AI appealing at first — was it cost, speed, curiosity, or something else?
AI-generated illustrations initially appealed to me for several reasons, but the biggest was affordability. As the founder of an independent publishing company, I have to be intentional about every investment I make. Custom illustration is a significant expense, so AI gave me an opportunity to begin visualizing my story without immediately committing to that level of financial investment.
Curiosity also played a role. I wanted to see what AI was capable of and whether it could help bring the characters I had imagined to life. It became a creative partner during the early stages of development, allowing me to experiment with different character designs, hairstyles, clothing, facial expressions, and scenes much more quickly than I could have otherwise.
Another advantage was that AI helped me clarify my own vision. Sometimes you don't fully realize what you want until you see what you don't want. Every image—whether it came close or completely missed the mark—helped me better define who Obasi, Mr. Marcus, and the other characters were in my mind.
Looking back, I don't see AI as a replacement for artists. I see it as one of many creative tools available to independent creators. For Obasi's First Haircut, it became an important part of my brainstorming and development process, even though I ultimately chose custom artwork from a professional storybook illustrator for the finished book.
As an independent publisher, I've learned that creativity often means using every resource available to you while remaining willing to change direction when the story calls for it.
Affordability and creative curiosity made AI a useful early-stage brainstorming tool to clarify character concepts.
What did those AI experiments actually look like? Which tools did you try, and how close did the results come to the Obasi you had in your mind?
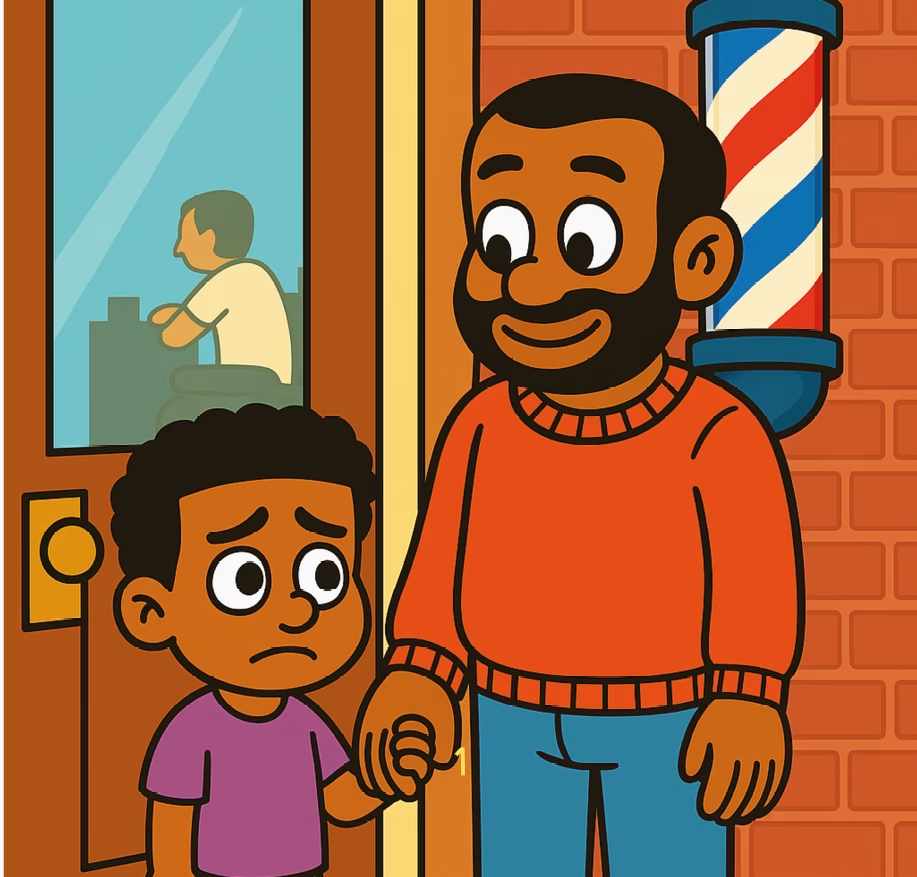
My AI experiments involved generating dozens of images as I worked to develop Obasi, Mr. Marcus, and the overall atmosphere of the barbershop. I experimented with different AI image-generation tools, using detailed prompts and making countless revisions to hairstyles, facial features, clothing, skin tones, body proportions, facial expressions, and the overall feel of each scene.
While the technology was impressive, consistency quickly became one of my biggest challenges. I might generate an image where Obasi looked exactly as I envisioned him, but in the next scene, he would suddenly look like a completely different child. The same was true for other characters and even the barbershop itself. Maintaining visual continuity from one illustration to the next proved difficult.
AI also struggled with some of the cultural and emotional details that were important to me. I wasn't simply looking for attractive illustrations—I wanted the warmth of the Black barbershop, authentic interactions between the characters, and visual details that reflected the personalities I had created in the manuscript.
Even though the AI-generated images never fully became the Obasi I had imagined, they played an invaluable role in the creative process. They helped me refine my vision, identify what mattered most to me as the author, and provided a strong visual foundation that ultimately made my collaboration with a skilled storybook illustrator even more productive. The AI images helped me discover my characters, but they didn't fully capture them. That distinction ultimately led me to custom illustration.
AI struggled with character consistency across pages and nuanced cultural details, proving it was a starting point rather than a final solution.
Was there a moment when you realized the AI images alone weren't going to be enough for the final book? What made you feel the story needed something more?
Yes. There absolutely was a turning point. As I continued generating AI illustrations, I found myself spending more and more time trying to "fix" the images rather than moving the book forward. I would adjust prompts, regenerate scenes, tweak hairstyles, facial expressions, clothing, and other details, hoping the next version would finally match the vision I had for Obasi and the world he lived in.
Eventually, I realized I wasn't simply looking for better illustrations—I was looking for consistency, personality, and emotional connection. I wanted readers to recognize Obasi from one page to the next and feel as though they were watching the same little boy grow throughout the story. AI could produce beautiful individual images, but it struggled to consistently capture the same characters and the emotional continuity I wanted across an entire picture book.
That realization made me understand that the story deserved something more. Obasi's First Haircut wasn't just about a haircut; it was about trust, confidence, community, and a memorable childhood milestone. I wanted the illustrations to carry those emotions just as strongly as the words did.
Looking back, I don't see that moment as AI failing. Instead, I see it as me recognizing that I had reached the point where collaborating with a professional storybook illustrator could take the story further than I could accomplish on my own. That realization ultimately led me to Gaurav.
Constant prompt-fixing showed that the book required human collaboration to achieve true emotional continuity and character consistency.
Once you decided to invest in custom illustration, did you have any hesitations — budget, trust, not knowing the process? What helped you move forward anyway?
Absolutely. I had several hesitations, and I think it's important to be honest about them because many independent authors face the same concerns.
The first was the financial investment. As the founder of an independent publishing company (Leave A Mark Press LLC), every dollar matters. Hiring a professional storybook illustrator was already one of the largest investments I had made for a single book, so I wanted to be certain I was making the right decision.
Beyond the financial aspect, there was also the element of trust. Entrusting someone else with characters you've imagined in your mind is not easy. I had spent months developing Obasi and the other characters, and I wanted to be confident that whoever illustrated them would respect the vision I had for the story.
What ultimately helped me move forward was communication. Gaurav listened to my concerns, answered my questions, and never made me feel like my feedback was too detailed or unreasonable. As we began collaborating, I saw that he genuinely wanted to understand my vision rather than simply complete a commission. That gave me confidence to continue.
Looking back, I'm grateful that I trusted both the process and my instincts. While it required a significant investment of both time and money, I believe the collaboration helped transform Obasi's First Haircut into the book I had envisioned from the beginning. Moreover, the experience reminded me that some investments can't be measured solely in dollars. They must also be measured by whether they help you create the book you envisioned and whether you can look at the finished product with pride.
Financial risk and trust were eased through open communication and a collaborative working partnership.
When we started working together, we used your AI experiments as a starting point and developed custom sketches of Obasi from there. What was that process like for you — and do you remember the moment you first saw a custom sketch and thought, "Yes — that's him"?
One thing I appreciated from the very beginning was that the AI-generated images weren't discarded. Instead, they became a starting point for our collaboration. They gave Gaurav a visual reference for what I had been trying to achieve while also giving us the freedom to refine and strengthen the characters through custom illustration.
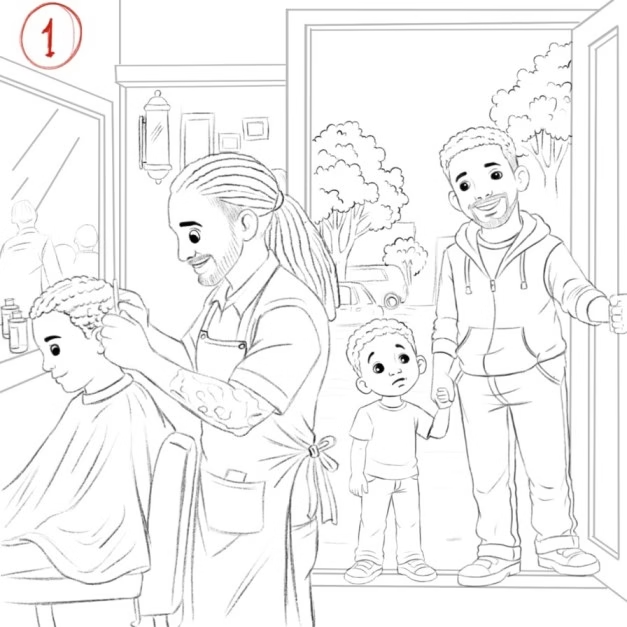
The sketch phase became one of the most valuable parts of the entire process. Rather than jumping straight into finished artwork, I had the opportunity to review the characters while they were still developing. That allowed me to focus on details that mattered to me before color was ever added.
I don't remember one single moment when I thought, "Yes—that's him." Instead, it happened gradually. With each round of sketches and revisions, Obasi became more recognizable, more expressive, and more aligned with the vision I had for him. The same was true for Mr. Marcus and the other characters. Every conversation and every revision moved us a little closer to the story I had imagined.
Looking back, I think that's one of the greatest benefits of working with a professional storybook illustrator. It's a collaborative process, not a one-time transaction. I wasn't simply receiving illustrations—I was helping shape them. By the time we reached the final artwork, I no longer felt like I was searching for my characters. I felt like I had finally met them.
Using AI concepts as reference points allowed iterative sketch reviews to gradually bring the characters to life.
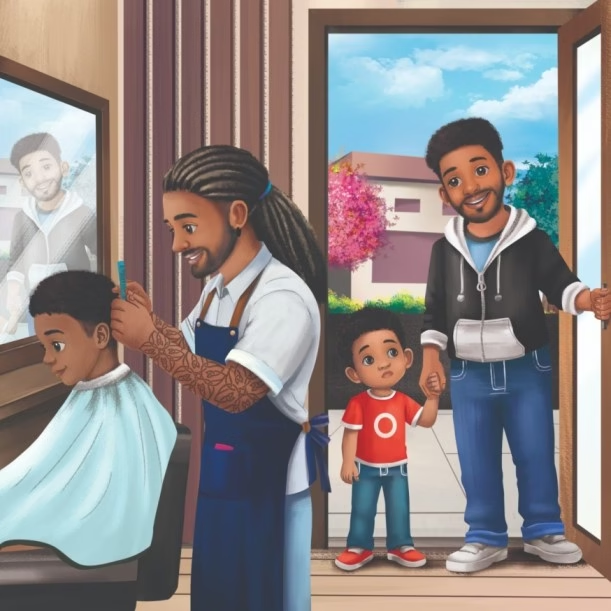
Now that Obasi's First Haircut is complete, what do you feel the custom illustrations brought to your story and your characters? Looking back, how did that differ from your earlier AI experiments?
The custom illustrations gave Obasi's First Haircut something the AI-generated images alone could not consistently achieve—heart, continuity, and personality.
The AI illustrations helped me explore ideas and visualize possibilities, but each image often felt like an individual moment rather than part of one cohesive story. With the custom illustrations, Obasi remained Obasi from beginning to end. Mr. Marcus remained Mr. Marcus. The characters developed identities that carried consistently throughout the book, allowing readers to build a genuine connection with them as the story unfolded.
The illustrations also captured many of the subtle details that were important to me as the author. Whether it was the warmth of the barbershop, the relationships between the characters, or the small visual touches that reflected their personalities, the artwork became an extension of the storytelling rather than simply accompanying the text.
In hindsight, I don't consider the AI experiments wasted time. They were an important part of the creative journey. They helped me refine my vision and gave both Gaurav and me a strong foundation for our collaboration. In many ways, AI helped me discover the characters, while working with a professional storybook illustrator brought them fully to life.
Today, when I hold the finished book today, I no longer see the individual steps that brought it to life. I see a little boy whose story finally matches the vision I carried in my heart for nearly a year. As both an author and a publisher, I'm proud that Obasi's First Haircut reflects the quality, care, and intentionality I want readers to associate with Leave A Mark Press LLC.
Custom art delivered emotional heart and visual continuity that isolated AI images could never achieve on their own.
Is there one illustration or scene in the book that became your personal favorite? What makes it special?
My favorite illustration is one of the playful interactions between Obasi and Mr. Marcus. While the haircut is certainly central to the story, that particular scene captures something even more meaningful to me—the relationship that develops between them.
One of my goals in writing Obasi's First Haircut was to show that a first haircut isn't simply about getting your hair cut. It's about trust, encouragement, laughter, and helping a child feel comfortable during a new experience. The playful exchanges between Obasi and Mr. Marcus help transform what could have been a frightening experience into one filled with warmth and connection.
I also think that scene reflects what makes many neighborhood barbershops so special. They're places where conversations happen naturally, where children are encouraged, and where trusted adults often become mentors simply by showing kindness, patience, and genuine interest in the young people who walk through their doors.
Every time I look at that illustration, I'm reminded that some of life's most meaningful memories aren't created during grand events. They're created during ordinary moments shared with people who make us feel seen, safe, and valued. That's the feeling I hoped to capture throughout Obasi's story.
The favorite scene highlights trust and mentorship between Obasi and Mr. Marcus in the neighborhood barbershop.
Sunday Barbershop Tales: Obasi’s First Haircut
Michelle’s favorite scene centers on the relationship between Obasi and Mr. Marcus.
She describes the moment as an example of how a first haircut can become a story about trust, encouragement, laughter, and connection.
If the interior illustration is available, this is the ideal location to insert the specific Obasi-and-Mr.-Marcus scene Michelle describes.
What was it like holding the printed book for the first time?
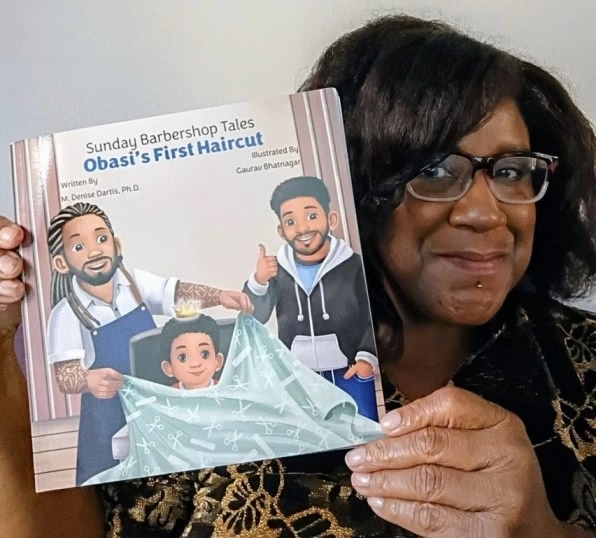
Holding the printed copy of Obasi's First Haircut for the first time was both exciting and emotional. After nearly a year of writing, revising, experimenting with AI, collaborating on custom illustrations, and making countless creative decisions, the story was finally real. It was no longer an idea on my computer screen—it was a book I could hold in my hands.
I remember flipping through the pages and appreciating how everything had come together. The words, the illustrations, the expressions on the characters' faces, and the overall flow of the story all reflected the vision I had carried with me throughout the creative process. It was incredibly rewarding to see that vision become something tangible.
As the founder of Leave A Mark Press LLC, that moment also represented something much bigger than a single book. It reaffirmed why I started my publishing company—to create meaningful stories that children can see themselves in and families can enjoy together. Holding Obasi's First Haircut reminded me that every challenge along the way had been worth it.
More than anything, I felt proud. Proud that I trusted the process, proud that I didn't settle when something didn't feel quite right, and proud that the finished book reflected the level of quality and care I wanted readers to experience from the very first page. The printed book wasn't simply the end of a publishing project. It was the realization of a vision I had refused to give up on until it felt exactly right.
Holding the final printed book validated months of hard work and reinforced the core mission of Leave A Mark Press.
Since publishing, has any reaction from a child, parent, or reader stayed with you?
Obasi's First Haircut is still a relatively new release, so I'm looking forward to hearing many more reactions from children and families in the months ahead. However, one thing that has stayed with me is how excited parents have been to see a story centered on a young Black boy experiencing such an important milestone.
Long before Obasi's First Haircut was published, several mothers stopped by my author table and asked if I had books specifically for boys. Their question stayed with me because I realized they were right. My children's publishing journey had begun with my granddaughter Trinity. Her heartfelt statement, "I wish I was white," inspired my second children's book, “I Wish I Was White: Racial Identity and Self-Esteem,” and the stories that followed grew naturally from that experience and other moments that touched my heart with her. I hadn't intentionally set out to write books primarily centered on girls—it was simply the path my inspiration had taken.
Those conversations encouraged me to think differently, and they planted the seed for a story that would celebrate a young Black boy and an important milestone in his life. That's how Obasi's First Haircut was born.
I've also been encouraged by readers who appreciate that the story celebrates something many families experience but don't often see represented in children's books. A first haircut may seem like a simple event, but for many children and families, it becomes a lasting memory. Knowing that readers recognize the importance of those everyday moments reminds me why I wanted to tell Obasi's story.
I hope the conversations continue to grow as more children discover the book. If Obasi's First Haircut helps even one child feel seen or helps one family create a new tradition around reading together, then I believe it has already accomplished something meaningful.
Reader feedback confirmed the deep need for books celebrating everyday milestones and positive representation for young Black boys.
If another first-time author was deciding between AI-generated illustrations and working with a professional illustrator, what would you encourage them to consider before making that decision?
While I am not a first-time author, I would encourage other authors to begin by asking themselves what their story truly needs rather than choosing one approach simply because it's faster or less expensive.
AI can be an incredible tool. It allows authors to experiment with ideas, explore different artistic styles, and begin visualizing characters long before they're ready to invest in custom illustrations. In my own journey, AI helped me refine my vision and better understand what I wanted Obasi to become. I don't regret using it at all.
At the same time, every story is different. There came a point when I realized Obasi's First Haircut needed the consistency, emotional expression, and collaborative creativity that came from working with a professional storybook illustrator. That wasn't because AI had failed. It was because the story had reached a stage where human artistic interpretation could take it further.
I would also encourage authors to think realistically about their budget, timeline, and long-term goals. Custom illustration is an investment—not just financially, but also in time, communication, and collaboration. It's important to choose an illustrator whose artistic style aligns with your vision and who is willing to listen, revise, and work with you throughout the creative process.
If there's one lesson I hope other authors take from my experience, it's this: don't let the tool dictate the story. Let the story dictate the tool. Whether that means AI, custom illustration, or a combination of both, choose the path that best serves the story you're trying to tell.
Let the unique needs of your story dictate your illustration approach rather than relying on speed or cost alone.
What was your overall experience working with Gaurav Bhatnagar, illustrator and is there anything about your journey we haven't covered that you think other authors should hear?
Overall, my experience working with Gaurav was a positive one. From the beginning, he welcomed collaboration and understood that bringing a children's book to life is a creative partnership. He was receptive to feedback, open to revisions, and genuinely wanted the illustrations to reflect the vision I had for Obasi's First Haircut. I appreciated that he shared sketches before moving to the final artwork because it allowed us to make thoughtful adjustments throughout the process rather than waiting until the end.
Like any creative project, our journey wasn't without challenges. Custom illustration requires patience and trust. Those experiences taught me to ask questions, communicate openly, and understand every aspect of the process before moving forward. Even so, I never lost sight of the bigger goal: creating the best possible book for my readers.
Every book has its own journey. Obasi's First Haircut taught me that creating something meaningful often requires patience, flexibility, and a willingness to trust both the creative process and the people who become part of it. I'm grateful for what I learned along the way, and I hope my experience encourages other aspiring authors to keep moving forward and to believe that their stories are worth telling.
True collaboration requires open communication, patience, and trust between author and illustrator.
AI vs. Custom Children’s Book Illustration: Questions Authors Ask
Why did Dr. Michelle Dartis initially use AI-generated illustrations?
Affordability was the biggest reason. AI also allowed her to visualize the story, experiment with characters and styles, and clarify what she wanted before committing to the larger investment of working with a professional storybook illustrator.
What was the biggest challenge with the AI illustrations?
Consistency. Michelle found that Obasi, other characters, and even the barbershop could change from one generated image to another. She also wanted cultural and emotional details that reflected the warmth, relationships, and personalities in the manuscript.
Can AI concepts be useful when hiring a storybook illustrator?
Yes. Michelle brought her AI experiments into the collaboration. They became visual reference material that helped communicate what she had been trying to achieve and gave the custom illustration process a useful starting point.
What did custom illustration add to Obasi's First Haircut?
Michelle described the result as bringing heart, continuity, and personality to the book. The custom artwork kept Obasi and Mr. Marcus consistent and captured details such as the warmth of the barbershop and the relationships between the characters.
Should authors choose AI or a professional storybook illustrator?
Michelle's advice is not to let the tool dictate the story. Consider what the story needs, along with budget, timeline, long-term goals, consistency, emotional expression, and the level of collaboration you want.
Your manuscript deserves illustrations that serve the story.
Already created AI concepts? That can be a useful starting point. Tell Gaurav where you are in the process and get a personal response about partnering with an expert storybook illustrator and leveraging professional book cover design services.
Tell Gaurav where you are in your children’s book journey. You can mention an existing manuscript, AI concepts, or a new project.